Post Goal:
This blog post summarizes how to compile and run a customized Linux kernel on a KVM-qemu virtual machine. It specifies:
- How to run a VM in KVM using a cloud image
- How to use a customized Linux kernel in place of the default shipped cloud image kernel
- How to use GDB with a customized Linxux kernel in KVM
Hardware & Software Specs:
The specs of my test environment are:
- CPU: Intel(R) Xeon(R) CPU E5-2620 v4 @ 2.10GHz
- Architecture: x86_64
- Total RAM: 125 GB
- Swap: 8.0 GB
- Host OS: Ubuntu 22.04.1 LTS
- Guest (VM) OS: Ubuntu 20.04 LTS Focal
- Host Kernel Version: Linux 5.15.0-47-generic
- Guest Kernel Version: Linux 5.19.7
- QEMU emulator version: 6.2.0
Booting a VM in KVM w/o Customized Linux Kernel:
There are a variety of resources online that suggest using virt-install and virsh to set KVM-based VMs. At first, I tried using these utilities as well, and with an Ubuntu ISO image I did reach a point where I launched a VM that I could ssh into. However, using virsh to
shutdown and/or startup the VM was unsuccessful. Therefore, I pivoted to using the qemu-system-x86_64 command instead, which does not abstract
away as much of the VM management details like virt-install and virsh.
Initially, I attempted to use an Ubuntu ISO image with qemu-system-x86_64. However, I struggled to successfully boot the VM. This is because the recent releases of Ubuntu ship with a graphical installer, which made it difficult to use since I was using a remote server as my host machine (it is strange I successfully used the ISO with virt-intall without X-forwarding but found tremendous difficulty with it when using qemu-system-x86_64). As such, I ultimately (and successfully) used a cloud image to boot my VM on my remote server.
To guide the use of a cloud image, I used this great blog post about cloud images and cloud-init. I used the Ubuntu 20.04 LTS Focal cloud disk image. Unlike the Ubuntu ISO, a cloud config image is also needed to specify who can login to your virtual cloud server. This is because when VM instances are launched in cloud, cloud-init searches for a datasource to obtain instance metadata. Since I was launching a local QEMU image, I provided a local data source for the cloud image to read from. There is a plethora of configurations that can be set, but for the purposes of this tutorial I provided minimal configurations, as shown below:
$ cat metadata.yaml
instance-id: iid-local01
local-hostname: cloudimg

$ cat user-data.yaml
#cloud-config
ssh_authorized_keys:
  - ssh-rsa <rsa key from id_rsa.pub>
The metadata.yaml file specifies configuration data for the VM itself, whereas user-data.yaml specifies the ssh key that I generated on my machine for my user (psinha) to be able to ssh into the VM without a password. To generate the cloud image that combines the data from both files, you can run
$ cloud-localds seed.img user-data.yaml metadata.yaml
QEMU defaults to using the SeaBIOS firmware for bootup. I used this open-source BIOS as well. The full QEMU command I used to boot the VM is:
$ sudo qemu-system-x86_64 \
    -machine accel=kvm,type=q35 \
    -cpu host \
    -m 4G \
    -smp 4 \
    -nographic \
    -device virtio-net-pci,netdev=net0 \
    -netdev user,id=net0,hostfwd=tcp::10022-:22 \
    -drive if=virtio,format=qcow2,file=~/focal-server-cloudimg-amd64.img \
    -drive if=virtio,format=raw,file=seed.img
Here’s a breakdown of the command:
-machine accel=kvm,type=q35enables KVM acceleration, which improves VM performance compared to using QEMU-cpu hostselects the CPU model and passes host processor features to the guest-m 4Gsets the amount of memory for the VM instance-smp 4sets the number of cores for a symmetric multiprocessing (SMP) computer-nographicdisables graphical output such that QEMU is a simple CLI application accessible within the terminal window we are using to launch the VM-device virtio-net-pcci,netdev=net0creates a virtio pass-through network device-netdev user,id=net0,hostfwd=tcp::10022-:22directs QEMU to listen to port 10022 on the host and relay any connections to port 22 on the VM. This allowed me tosshinto my VM without obtaining its IP address-drive if=virtio,format=qcow2,file=~/focal-server-cloudimg-amd64.imgspecifies the Ubuntu cloud image downloaded earlier as the virtual disk image for my VM-drive if=virtio,format=raw,file=seed.imgspecifies that the seed image I created earlier will be a secondary image used as my local datasource
After running the boot command, I accessed the VM directly via a separate terminal window. Since in my boot command I created a redirect of localhost’s port 10022 to forward traffic to my VM’s port 22, I ssh to my VM using port 10022 with ssh -p 10022 ubuntu@0.0.0.0. I verified my VM has internet access by simply executing sudo apt-get install vim in my VM to ensure the apt-get utility can connect to the internet and install any packages.
Booting a VM in KVM w/ a Customized Linux Kernel:
The previous section focused on booting a VM with an Ubuntu 20.04 cloud image. I did not change the kernel version that ships with the cloud image. In this section, I will show you how you can use your own kernel version and install kernel modules. The benefit of doing this is you can edit the source code of the kernel and see the implications of your changes in your VM.
I used the Linux Kernel 5.19.7. After wgetting the tar file, I extracted the source code into ~/linux-5.19.7 on my host machine, created a separate build directory ~/kbuild (which was a sibling of ~/linux-5.19.7) and ran the following in ~/kbuild:
$ yes "" | make -C <kernel dir> O=$(pwd) config
This makes a configuration file (.config) in ~/kbuild with the default options selected. Prior to building the kernel, I edited the generated .config file by clearing:
CONFIG_MODULE_REVOCATION_KEYS=""CONFIG_MODULE_TRUSTED_KEYS=""CONFIG_MODULE_TRUSTED_KEYS=""(although below I explain why I ultimately should not have cleared it).
This ensured that during the installation of kernel modules (the following step), I did not need any signatures to install the modules. I also ensured that CONFIG_SATA_AHCI=y such that the SATA disk driver was built into the kernel.
I next built the kernel in ~/kbuild by running make -j4. The -j4 option speeds up the building process by using multiple cores. Unfortunately, the build still took around 2 hours! After doing so, I installed the kernel modules locally on my host machine. Since I did not pair down my .config file or use make menuconfig, the default kernel modules that ship with the Linux Kernel 5.19.7 were installed. I created another directory ~/install_mod_dir to install the kernel modules. In ~/kbuild, I executed:
$ make INSTALL_MOD_PATH=<install_mod_dir> modules_install
At first, I received the following SSL error message:

This is because I had cleared CONFIG_MODULE_SIG_KEY in my .config file in ~/kbuild. After setting CONFIG_MODULE_SIG_KEY="certs/signing_key.pem", I remade the kernel, built the kernel, and successfully installed the kernel modules.
Next, I mounted my disk image to a local directory ~/mount_point that I created such that I could copy the kernel modules installed on the host machine onto the disk image. I used the guestmount command, as shown below:
$ export LIBGUESTFS_DEBUG=1 LIBGUESTFS_TRACE=1
$ guestmount -a ~/osmedia/focal-server-cloudimg-amd64.img /dev/sda1 ~/mount_point
The -m flag specifies the partition in the disk image that I want to mount. I determined that the root directory of my VM is on the /dev/sda1 partition by logging into my VM and running df in the root directory. The export enabled me to debug if the guestmount command failed. This was especially useful, as I immediately ran into an error:

Ultimately, running the guestmount command in sudo (sudo su) enabled me to successfully mount the disk image and overcome the Permission Denied error. I then copied the installed kernel modules (using the cp command) from ~/install_mod_dir/lib/modules to ~/mount_point/lib/modules and unmounted the disk image
$ fusermount -u ~/mount_point
One issue I encountered as I was attempting to copy the kernel modules to the disk image was running out of disk space. This is because the default virtual disk size was 2.2 GB. To increase the virtual disk size, I ran
$ qemu-img resize focal-server-cloudimg-amd64.img 10GB
Now I was able to successfully copy the modules to the disk image.
After, I successfully booted the VM with my customized Linux kernel by slightly tweaking the intial VM boot command. The full command is below:
$ sudo qemu-system-x86_64 \
    -machine accel=kvm,type=q35 \
    -cpu host \
    -m 4G \
    -smp 4 \
    -nographic \
    -device virtio-net-pci,netdev=net0 \
    -netdev user,id=net0,hostfwd=tcp::10022-:22 \
    -hda /home/psinha/osmedia/focal-server-cloudimg-amd64.img \
    -hdb seed.img \
    -kernel "/home/psinha/kbuild/arch/x86/boot/bzImage" \
    -append "root=/dev/sda1 console=ttys0,115200n8"
-kernel <path/to/kernel image>prompted QEMU to to use the specific kernel we built in the previous steps-append “root=/dev/sda1 console=ttys0,115200n8”specified where the partition of the root directory on our disk image is and to add a console to the log in of the VM
I verified that my VM kernel version was correct by running uname -r in my VM. Moreover, I verified that my VM had internet access by successfully executing sudo apt-get install bison.
Booting Information:
To measure the amount of time the kernel spent booting, I used two different commands: dmesg and systemd-analyze. The dmesg command prints the kernel ring buffer, where the kernel and other devices write bootup messages. The final line of dmesg showed [24.975658], which is when the last message was written to the kernel buffer. When running systemd-analyze in our VM, I saw

As seen, there is a difference between the elapsed wall clock time reported by systemd-analyze and the time reported by the kernel. This is because the dmesg command simply collects information from the kernel ring buffer and is hence not a reliable source for determining how long the boot-up process took. Device drivers and other kernel messages could have been written to the kernel ring buffer at any point in time. In fact, there may be other system processes spawning between those messages. Thus, systemd-analyze is a more accurate utility for determining boot up time.
Next, I analyzed dmesg to see the kernel connecting to various devices. I used lspci to see information about each PCI bus on my VM:

I then used the classes of each to determine the devices connected to that bus. Specifically, I examined the Host Bridge type 00 PCI bus from the dmesg output. Below are lines found in the dmesg output, with each line representing a different device.
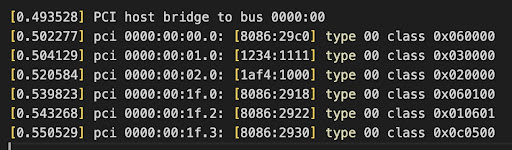
Each of the different hex values corresponds to a different macro defined in include/linux/pci_ids.h. We see the following:
#define PCI_BASE_CLASS_NETWORK		    0x02
#define PCI_CLASS_NETWORK_ETHERNET	    0x0200
#define PCI_CLASS_NETWORK_TOKEN_RING	0x0201
#define PCI_CLASS_NETWORK_FDDI		    0x0202
#define PCI_CLASS_NETWORK_ATM		    0x0203
#define PCI_CLASS_NETWORK_OTHER		    0x0280
I interpret the address to specify the devices. For example, 0x0200 is the address for a network PCI Ethernet device. This aligns with the dmesg output as well as the lspci result.
Creating a KVM+GDB Friendly Kernel:
To enable using GDB with KVM, I needed to properly set some CONFIG_DEBUG_* options in the .config file. Below is more information about each option we changed:
CONFIG_DEBUG_INFO=y: compiles the customized kernel with debug info enabledCONFIG_DEBUG_INFO_DWARF4=y: creates dwarf4 debug infoCONFIG_GDB_SCRIPTS=y: creates links to GDB helper scripts in the build directoryCONFIG_GDB_INFO_REDUCED=n: disables reduced gdb infoCONFIG_FRAME_POINTER=y: compiles the kernel with frame pointers, this was enabled because the host architecture supports itCONFIG_KGDB=y: enables remote debugging of the customized kernelCONFIG_SATA_AHCI=y: enables support for AHCI Serial ATACONFIG_KVM_GUEST=y: option enables various optimizations for running under the KVM hypervisorCONFIG_RANDOMIZE_BASE=n: disables Kernel Address Space Layout Randomization (KASLR); I also addednokaslrto-appendin our boot commandCONFIG_SMP=y: enables Symmetric multiprocessing support (SMP), or in other words support for our VM using more than one core
After changing the .config, I remade my kernel, rebuilt my kernel modules, and reinstalled my kernel modules. Then, I copied the new kernel modules to my disk image, as done previously in the lab. Finally, I included -gdb tcp::3872 in my QEMU boot command. This allowed me to set up a remote connection to my VM when running gdb in my host machine. Specifically, after launching my VM with my boot command, in ~/kbuild I ran the following to get my gdb session to remotely connect to my VM:
$ gdb vmlinux
(gdb) target remote: 3872
Summary:
I hope this post is helpful to students or others just trying to set up a VM on top of a KVM hypervisor via the command line. Surprisingly, there isn’t great documentation online for the qemu-system-x86_64 command and I had to dig very deep into source code and random documentation to get this entire process to work. Hopefully this will save you a lot of time!